I’ve been taking Primal Queen for 6 months to see whether it could actually live up to its claims—and whether I’d fall into the 9/10 success group or the 1/10 that doesn’t see much change.
So, what are you supposed to expect at the 6-month mark?
Enhanced mental clarity
Better muscle function
Improved recovery from physical activity
My Results After 6 Months
Here’s the honest answer:
My results were inconclusive.
And that’s not because the supplement “didn’t work”—it’s because I didn’t use it consistently enough to give it a fair test.
Where Things Started Slipping
Like I mentioned in my 4-month update, I became increasingly inconsistent with taking Primal Queen.
And that matters.
Because supplements are supposed to:
fill in the gaps of your nutrition, sleep, and training—not replace them.
They’re not a silver bullet.
What Actually Changed (More Than the Supplement Itself)
Here’s where things got interesting.
Because I saw early benefits—especially with:
cycle regulation
fatigue
pain management (better than relying on NSAIDs like Tylenol)
…I realized something:
If this helped a little, what happens if I fix everything else?
So I started making changes:
Cooking real meals (curries, rice dishes) instead of eating spicy noodles 5 days a week
Adding smoothies and bananas for easier nutrition
Foam rolling and using Tiger Balm for recovery
Letting myself sleep when I’m tired instead of forcing productivity
Even though my sleep is still fragmented (waking up every ~2 hours), I stopped fighting it as much.
Did Primal Queen Live Up to Its Claims?
Not fully—but not in a way that makes it a failure.
It helped in specific areas early on, but:
my inconsistency + improved habits made it hard to isolate what was doing what
Over time, it felt like both:
my results plateaued
and my reliance on the supplement decreased
Would I Recommend Primal Queen?
Here’s my honest take:
If I know you personally, I’d share my unopened bags with you to try
If not, I’d say:
“Try it if you have the extra money—but don’t rely on it.”
This isn’t a must-have supplement.
It’s a:
“test it and see how you respond” situation
Will I Continue to 1 Year?
Personally, no.
I’ll still take it occasionally (about once a week), but I’m more interested in exploring:
other supplements with longer track records
stronger research backing
Not chasing a miracle—just being more intentional.
The Real Lesson From This Experiment
This wasn’t a failure.
If anything, it forced me to:
take my nutrition more seriously
improve recovery habits
stop relying on convenience foods
and think long-term about my health
Ironically:
my inconsistency with the supplement led to better consistency in everything else
Final Thoughts
If you’re expecting a supplement to fix everything, this probably won’t.
If you’re already working on:
your nutrition
your recovery
your training
…it might help fill in some gaps.
Just don’t expect it to carry the load for you.
Final CTA
If anything I wrote resonated with you—even a little—or if you’ve been through your own wellness experiment that didn’t give you clean answers either, you’re not alone in that.
If you’d like to support The Stratagems Archive, you can do so by liking, sharing, subscribing, or clicking the Tiny Wave button, which takes you to my Ko-fi.
And even just visiting means something. It tells me there are other people out there on their own path, figuring things out in real time, not just reading about perfect outcomes.
People come in to let off steam, but sometimes they forget that rules still apply.
That night, a group of adults ignored my instructions entirely. I had told them their time was up. I made eye contact, warned them, and walked away.
They slammed their weapons against the metal anyway.
It was infuriating—but it taught me a critical lesson: how to handle adults who can act like overgrown children.
And when this happens, you need a method to reclaim control.
Using Controlled Force
In a noisy environment like the rage room, yelling doesn’t always work. So I used controlled force: I firmly pounded my fist against the door to reinforce my presence, signaling they needed to pay attention, then entered the room.
When I asked them again if they were done, and they said yes, I moved them out of the room.
Simple, firm, non-negotiable.
It wasn’t aggression, not in a visceral sense—it was clarity, presence, and boundaries in action.
If you’re like me and are learning to set boundaries and be firm as an adult, then know it will feel uncomfortable at first, but it is a necessary muscle that needs exercising.
Lessons You Can Apply
Be clear with your instructions: People often ignore rules because they think someone else will enforce them.
Use presence over physical force: You don’t need to tap anyone’s shoulder to be taken seriously. Body position, gestures, and a calm, firm voice go a long way.
Assert your boundaries: You don’t need to explain, apologize, or justify. Enforcement is the signal people respond to.
Learn from one-off experiences: That night was a one-off, but they are bound to repeat. Learning now equips you for similar situations.
These are skills I practiced in real time—calm authority, controlled force, and follow-through—and they can apply anywhere you face disregard.
Take Action Today
Next time someone ignores your instructions or crosses boundaries, try controlled presence:
Stand in a visible position.
Use deliberate gestures to signal attention.
Speak clearly and firmly.
Follow through without apologizing or overexplaining.
This works in high-stress jobs, meetings, or even day-to-day interactions where people try to push you around.
Apply This Now
Have you ever had to assert control when someone ignored the rules?
Try using controlled force method, share your story in the comments below. If you found this post helpful, feel free to like it, share it, or hit the wave button to support the archives!
Below you can explore with me how rage rooms can be an essential tool to our mental health and how they become a place where people leave their mark in plain sight.
The Stratagem’s Archive is where restless minds turn curiosity into action. Subscribers—our Fellow Archivists—get access to:
Practical guides and experiments: From fitness flows to financial planning, video game strategy to online safety, try exercises and tools that work in real life.
Insights you won’t find elsewhere: Lessons from life, games, and experiments distilled so you can learn without getting stuck in endless thinking.
A space to explore, not perform: No pressure. No judgment. Just a living archive for discovery.
If you’ve ever felt like you’re spinning your wheels, this is your chance to turn your energy into something worth exploring.
Join the Archive today—become a Fellow Archivist and start experimenting with your curiosity.
Have you ever been trapped in a storm, sitting in your car, gripping the wheel so tight it feels like your knuckles might explode, thinking, “I could be anywhere else right now—safely”?
That was me at 4:30 a.m., driving through torrential rain, lightning flashing 18 times since I parked, and wind so strong it felt like it might push me off the road.
Heavy rain, high winds, and floods had been battering our island for over a week. Sure, we need the rain to keep the greenery alive—but Mother Nature was working overtime.
I work in a warehouse, and part of my job means hauling freight from the yard into the building. In ideal conditions, that’s fine. But today? Not so much.
By the ninth lightning flash, one of them was so bright I felt momentarily blinded. Luckily, the road was straight and empty—but it made me think: why do jobs expect us to risk ourselves in conditions like this?
Why Am I Working During a Storm?
Simple question. Complicated answer.
I can’t afford to look for another job right now.
Life throws curveballs—rising rent, bills, fractured sleep, and jobs that expect you to treat your safety like an optional bonus. My assets are already set to go to my parents if something happens. Because nothing says “good morning” like questioning your mortality at 4:30 a.m., right?
I’d love to work from home, write, or do something dry and safe. But my current job literally pays me to work out—just not under these conditions.
So the goal for today? Survive. And maybe, just maybe, make it home in one piece.
The Reality of Hazard Pay—or the Lack Thereof
A little extra compensation in extreme weather would be nice. Even if it only happened once in a while, it would show management that they value our safety. But wishful thinking aside, the storm doesn’t care about your paycheck—it’s just going to keep raining. And we just keep working.
If You Made It to the End
Thanks for reading my work rant.
Most of us have had days when we’d rather be anywhere else than at work—especially in extreme weather.
And while this is my personal experience, the underlying reality touches many: jobs sometimes expect us to treat ourselves as invincible.
If this story resonates, feel free to like, comment, subscribe, or share with someone else questioning why they’re out in the storm.
What’s the worst weather you’ve had to work through?
Explore The Archives
I write about more than just questioning my life choices at 4 a.m.
Never mind. I woke up earlier this morning, the rain had settled, the clouds were slowly dispersing, the sun was slowly peaking through the haze, and now it is hot!
Like clothes sticking to your skin uncomfortably hot.
At least I don’t have to worry about getting struck by lightning or drenched to the bone in the torrential rain anymore.
If you read Part 1 of my cleaning misadventures with my toilet, then you know my 9-month-old toilet calcium build-up laughed in my face while I tried baking soda and vinegar.
For weeks, I sprinkled, poured, scrubbed, waited, and scrubbed some more.
Spoiler alert: nothing changed.
The white chalky ring mocked me like it had tenure.
Being cheap, living alone, and already battling the tiny apartment smell cave I call my studio, I didn’t want to risk harsh chemicals. I don’t want the smell of bleach or acid lingering in my bedding for days like when I cleaned the bathtub with Fabuloso. So, I went old-school with good old fashioned Coca-Cola.
Coca-Cola to the Rescue?
Here’s what I did:
First soak: Poured 3–4 8 oz cups of Coke into the bowl, let it sit for 25 minutes, scrubbed for 5 minutes.
Second soak: Reapplied Coke, let it sit 15 minutes, scrubbed for 5. Then… I kept going. Another 5 minutes. And again. And again.
I lost count of how many 5-minute sets I did, but my arms and shoulders felt it. Honestly, I added 5 sets of 5 minutes to my exercise log—so technically, cleaning a stubborn toilet can be considered exercising too.
My iPhone timer went off so many times that I felt like I was trapped in some sadistic cleaning version of Groundhog Day.
Progress You Can Actually See Under The Calcium Deposits
After multiple rounds of soaking and scrubbing: The chalky calcium was finally coming off.
The stubborn deposits felt grainy under the brush, but the porcelain underneath was smooth again. Most of the ring was gone.
Not 100%, but enough that I can finally see light at the end of this toilet nightmare tunnel.
Finishing Touches
Once I flushed away the Coke (no bug metropolis on my watch), I added Fabuloso for a clean finish. Smelled nice. Felt nice. And most importantly, my toilet finally felt like it belonged in a clean home, not a chemistry experiment gone rogue.
The Verdict
Coke gave me hope. Baking soda and vinegar? Not even a little. If you’re like me—cheap, living alone, not about to inhale harsh chemicals in your tiny studio—this might actually work for you.
The calcium isn’t completely gone yet, but I think I can finally hit the 1-year mark of living on my own with a clean toilet. And maybe, just maybe, I’ll stop feeling personally attacked by my own plumbing.
If I feel up to it, then I might as well go hunting for lemon juice, or buy lemons, next week to see if citrus might help finish what the Coke started wearing down. Otherwise, I’ll just update things here.
If You’re in the Same Boat
I know I’m not the only one who’s stared at a toilet like it’s judging them. If you’re frustrated by stubborn calcium, hate harsh chemicals, and don’t want to spend a fortune on “miracle cleaners,” give this method a shot.
Like, subscribe, or share this with someone who’s fed up with vinegar and baking soda being the only solutions outside of harsh chemicals.
You can even click this little button here so I can know a person visited and found this bathroom ordeal as stupid as I did.
You can even click this little button so I can know a person visited and found this bathroom ordeal as stupid as I did.
Thank You For Spending Time With The Archives
If you made it all the way to the end of this post, then feel free to check out my other DIY projects I tackled so far. You could even read more on part one where I bash on baking soda and vinegar being the “miracle cleaner” that doesn’t work below.
I moved into my first ever studio apartment nearly 9 months ago. For the first 6 months, I didn’t clean my toilet at all. I only focused on cleaning my shower and sink.
My toilet? Shit out of luck.
However, by the time I actually looked at it, the white above the waterline had started turning grey. Weird, ugly, and stubborn — just the way I like my problems to test my patience.
Turns out, that ugly grey stains are called calcium deposits.
They remind me of plaque, but for toilets—stubborn and brushing isn’t enough to get your teeth clean. We need to floss, mouthwash, rinse and repeat this process somehow.
Because calcium deposits are ugly, can damage my toilet, and cost me way more financially than a very upset stomach after eating Taco Bell’s.
THEY. NEED. TO. GO!
So, I tried the obvious solution: baking soda and vinegar. Thankfully, I already had these on hand.
Spoiler alert: it didn’t work…
The Baking Soda + Vinegar Saga
I’ve been scrubbing this toilet like it personally offended me, every week, for the last 5–6 weeks.
I sprinkled baking soda, poured vinegar over it, let it sit 20–30 minutes, and then scrubbed for 5–10 minutes, iPhone timer in hand.
Guess what? Nothing. Nothing changed. The calcium deposits were still there, looking the same, mocking me with every scrub of my very firm bristled toilet scrubber.
I even tried just baking soda on its own last week. Covered the entire bowl, left it for more than an hour because I got distracted, then scrubbed for 5–10 minutes… and it still looked the same.
Like, what the fuck? My eyes aren’t broken — the calcium is just a stubborn little bastard that refuses to quit.
Guess what? So am I—stubborn as hell and refusing to quit.
Why This Method Doesn’t Work (For Long-Standing Buildup)
Here’s the deal: baking soda + vinegar only works if you’re an OCD-level clean freak who never lets deposits form in the first place.
I’m not.
My toilet has been living its best 9-month uncleaned life, and now it’s punishing me. The consequences of my own actions are haunting me.
Also, harsh chemicals are out of the question for me. My bed is literally in front of my bathroom. I don’t want to sleep in chemical fumes for days like I did when I cleaned the bathtub with Tropical SpringFabuloso.
Nice smell, yes, but still too strong for my tiny space.
What I’m Going to Try Next
Since baking soda and vinegar failed miserably, even after repeated failures but apparently I’m insane, my next experiments are going to use a few liter bottles of Coke and lemon juice. That’s right — I’m not giving up yet.
I’m stubborn, pissed off, and determined to figure this out without resorting to harsh chemicals.
Consider this Part 1 of my saga. Part 2 will cover the results of these experiments: which method finally gets this calcium out, and whether any of it is worth trying for your own toilet nightmares.
If You’re Fed Up Too
I know I can’t be the only one who’s stared at a toilet like it’s mocking them. If you’re just as tired of half-assed advice, if baking soda + vinegar isn’t cutting it for you either, you’re not alone. This is a space to vent, experiment, and maybe even finally get results.
Leave a comment, like, or share this around if you’ve had your own calcium showdown or know someone going through the same frustrations.
I want to hear how furious, stubborn, or creative you’ve gotten trying to deal with it, and what finally got through your own toilet demons.
You can even do it anonymously, without a WordPress account, or even a thumbs up emoji to say, “I’m fed up with the consequences of my own actions, but got through them anyways.”
Or if this made you let out a short, “heh,” at the ridiculousness of the situation or because my frustration made you not think about your problems for a second, that thumbs-up emoji can be used for that too.
Call to Action
If you’re fed up with stubborn calcium like I am and want to support me testing weird home remedies (Coke, lemon juice, and whatever else), you can drop a dollar by clicking this tiny wave button of encouragement below. Every bit helps me keep testing these ridiculous toilet demons so you don’t have to!
Stay tuned for Part 2: the experiments with Coke and lemon juice, because I’m not letting this calcium win. And if you’ve got a method that works, I want to hear it. Let’s finally beat our bathroom nightmares together.
Explore The Archives For More DIY Issues I’ve Tackled So Far
If your 2013 Dodge Dart front turn signal is blinking rapidly, it usually means 1 of 3 things:
A bulb is burnt out
The bulb is loose
There is corrosion on the socket
Quick Fix Steps
Open the hood
Locate the turn signal housing
Twist the bulb counterclockwise
Check for corrosion
Confirm you have the correct double-filament bulb
Clean the socket if needed
Reinstall and test
If that doesn’t work, you may need a replacement bulb or require professional help to fix this issue.
When You’ve Been Putting Off Repairs, You Start DIYing Things Yourself
So, I have a 2013 Dodge Dart, a car that’s been discontinued for years, and I had been putting off fixing my car’s front left turn signal blinker light.
Whenever I would signal that I was turning, I would hear an annoying rapid clicking sound.
My rear blinker light still worked. However, my front left blinker was the problem; people wouldn’t know if I was turning if we were facing each other until I was turning.
It’s not safe playing chicken with oncoming traffic like that.
I didn’t have enough money to pay for professional help or the time to go to a mechanic shop, and I figured that I could treat this problem like an oil change—change it myself.
It’s a small light, but driving without it made me feel unsafe and frustrated every time I hit the blinker.
I knew I could pay a mechanic when I had the money, but I wanted to try fixing it myself—and maybe save some cash and time in the process.
Disclaimer: I Am Not A Mechanic
I am not a mechanic and I’m not formally trained to diagnose automobile issues.
I didn’t go to a shop because I didn’t have the time or money, so I troubleshot the problem myself and figured it out along the way.
Here’s what I learned by fixing my own blinker light.
Tools To Have On Hand to Change Your Blinker Light
Before I tackled my blinker light on my own, I made sure that I had a few things on hand:
My phone (for YouTube guidance)
Spare gloves (keeps my hands clean)
A multi-tool (for leverage or prying)
A flashlight (for hard to reach spots)
And spare blinker bulbs (ESSENTIAL!!!)
The gloves helped to keep my hands clean from directly touching whatever I would find under my hood.
My multi-tool would be handy just in case I needed leverage.
A flashlight to see better where broad daylight might not shine in the right spots.
And you can’t change your blinkers without spare bulbs.
My Step-By-Step Process to Avoid Spending 2 Hours on a 5 Minute Problem
We have our tools.
We know what problem needs fixing.
Now we can get started.
First thing you need to do is pop open the hood. The blinkers are accessible underneath the hood of the car, not from the blinkers themselves in the front.
Next step is to open YouTube to troubleshoot the problem. I watched a YouTube video from Electrical Car Repair LIVE, called, “DODGE DART FRONT TURN SIGNAL LIGHT BULB REPLACEMENT AND SIZE.”
I followed the video, found where the blinkers are housed, then I pulled the blinkers bulb out by twisting counterclockwise and out of its housing.
My bulb wasn’t burnt out, but I found white residue along the base of the bulb and on the socket. That’s corrosion and oxidation of the metal. It’s supposed to be normal, but take my word with a large sack of salt.
With my glove and multi-tool, I had spent more than 10 minutes trying to pry my blinker bulb out without cracking the bulb or damaging the socket.
I had used a dull knife from my multi-tool to gently scrap the corrosion off of the bulb and the socket, pulling and jiggling it, to loosen.
When the bulb came free, I kept it just in case. I had 2 replacement bulbs in my car, so it should have been an easy fix, right?
Not for me.
I had spent 2 hours fighting with my replacement bulbs because they wouldn’t set into the socket. It would go in half-way, then it would fall out.
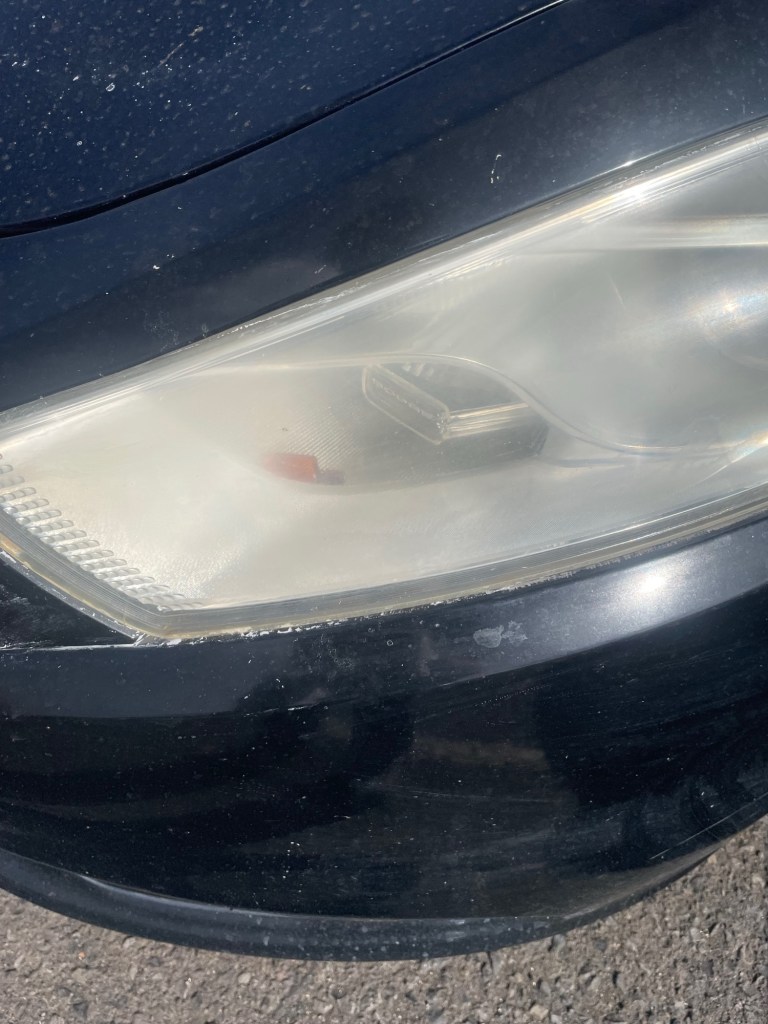
Let me show you what happened to one of my replacement bulbs.
My 2013 Dodge Dart’s front headlight with the ill-fitted replacement bulb sitting in the crevices and not in the socket. it fell out because I wasn’t paying attention.
The reason why I had spent 2 hours fighting with my replacement bulbs was, not because of the corrosion or that my bulb socket was damaged, because my replacement bulbs were single prong filaments.
My Dodge used double prong filament bulbs.
I even called my dad—not for answers, just to talk—and he asked, “Did you check the bulb?” I hadn’t. That simple question saved me hours if I had thought of it earlier.
Since I didn’t have the correct replacements, and my original bulb wasn’t burnt out and it was covered in corrosion, I used my gloves and the dull knife to scrape off the white substance to ensure conductivity was possible again.
Thankfully, it worked out.
Once the corrosive matter was cleaned from the bulb and the socket, I fit my existing bulb back into its socket, turned my car on, and turned my blinker on.
No rapid clicking!
My blinker was safely working again.
Now, I don’t have to play chicken with oncoming traffic anymore.
What is The Moral of this Story?
The moral of the story is to make sure you pay attention; had I noticed such small, but significant, detail sooner, I wouldn’t have a stuck bulb in my headlights.
Most bulbs look very similar when you don’t have prior knowledge and have numbers on them; each car takes a different bulb, like how certain things take certain battery types. I was forcing a D-battery into a C-port.
The next time my front turn signal is in need of a new bulb, now I know which I would need to grab instead of grabbing anything and hoping for the best.
Final Thoughts
Fixing my turn signal took me about two hours, mostly because I didn’t realize my replacement bulbs were the wrong type. If I had checked the bulb type first, this probably would have been a five-minute job.
Still, I’m glad I tried fixing it myself.
I saved money, learned something about my car, and now I know exactly what kind of bulb my Dodge Dart needs the next time this happens.
Sometimes small problems look bigger than they really are. With a little patience, a flashlight, and a YouTube video or two, you might be able to solve them yourself.
And if not, at least you’ll understand the problem better before taking it to a mechanic.
If This Helped You
If this post helped you fix your turn signal—or at least helped you troubleshoot the problem—feel free to share it with someone else who might be dealing with the same issue.
I also write about DIY fixes, personal training over 280 weeks, personal finances on a $40K salary, and figuring things out through trial and error and a hint of stubbornness.
If you enjoy posts like this and want to help fund future experiments, troubleshooting guides, and DIY attempts, you can tap the little wave button below to visit my Ko-fi page.
I currently support the blog myself, but outside support is always appreciated.
Plus, it helps me to see if people dropped by and visited the archives, instead of bots doing their jobs and indexing.
Either way, thanks for reading—and drive safe.
One Last Thing
Have you ever tried fixing something on your car that should have taken five minutes… but ended up taking two hours?
Or have you run into the same issue with the wrong type of bulb?
Feel free to share what happened in the comments or share anonymously by clicking on the Tiny Wave button above. I’d be curious to hear how other people solved it.
Some days, I wonder how to say hi without anyone having to say it back. How to share a quiet moment with someone, even if it’s just in passing.
That’s what led me to create The Quiet Archives, a small PDF of reflections and thoughts I’ve been gathering across my other PDFs.
It’s not a manifesto, not a guide, not advice — just me putting words down and offering them quietly to anyone who might resonate.
It’s six pages long, hand-crafted in tone and pacing, meant to be read slowly, like leaving a note for someone who might stumble upon it.
Inside, I share reflections on endurance, self-kindness, grief, and the tiny steps I’ve tried taking to care for myself in the midst of everything life keeps throwing.
If you’re curious, you can find The Quiet Archives here and it is yours to read.
There’s no obligation; it’s just a way to share a quiet space with anyone who might want it.
Sometimes, a simple hello doesn’t need a direct response. This is just my version of saying hi without having to say it.
If anything inside The Quiet Archives, and previous PDFs, resonated with you, gave you something to think about, or allowed you to see things from a different perspective, click the Tiny Wave button below.
I support this work myself. If you found value in it and want to help keep it available, optional support is here 🌊.
If you’ve tried to stay consistent but keep feeling like you’re “starting over” because your work schedule, energy levels, or life responsibilities keep shifting — this PDF is for you.
Why This ISN’T Your Typical Workout PDF
This isn’t another workout PDF.
There are exercises inside it, but they aren’t instructions or prescriptions.
This is a 5 page reflection, including a reflective questionnaire, on how I’ve trained across changing jobs, energy levels, injuries, and mental load — and how I stopped treating inconsistency as failure.
The goal was to become gentler when things got messy and to not treat inconsistencies, low energy, or injuries as moral or discipline problems.
Functional Strength, Mobility, and Capability Options You Can Adapt—No Gym Required.
It has a few follow along exercise flows inside that can be done between 15-30 minutes, depending on how much energy you have left.
Although, if you’re trying to understand how to keep your fitness goals alive when life won’t slow down, and your not “starting over,” then this one was written for you.
280+ Weeks of Experimenting, Adapting, and Improvised Movement
If you’re trying to strength train at home while dealing with shoulder pain, bad knees, or lower back tension from work, your warm-up matters more than your workout.
I’ve been training at home for over 280 weeks after repeated overuse injuries from manual labor jobs. This is the diagnostic warm-up I use before lifting sandbags, bands, or bodyweight so I can train consistently without making those injuries worse.
Before Continuing
In my entirety of writing about my Chaotic Life Strong personal training philosophy and regimen, especially in my Fitness Built For Real Life, By Real Life page, I want to make sure that I keep some truths at the forefront of this video demonstration before we continue:
I am not a certified personal trainer; I don’t have credentials, a clientele, nor a degree in kinesiology, nutrition, or sports science.
What is shown here has been roughly the culmination of 280+ weeks of trial and error and learning from multiple sources to have created my own hybrid process.
How I train is rarely, if at all, documented; unless I’m performing any new exercises and need a visual cue to keep myself accountable. Else, those documented videos aren’t always kept for long.
Everything shown is personal; it works for me, it works with my constraints: my energy, mood, and if I’m up to training the day of.
Nothing here is prescriptive, it’s not comprehensive, but if something catches your eye, you want to give it a try, or you don’t want to—it is fine either way.
The work exists regardless.
I just wanted to share my process, why I chose to develop it the way it became now, and not let my hard won insights exist only in my head.
How I Warm Up
How I Train in My Little Studio Set Up
Why I Warm Up Before Strength Training at Home
My warm-up is diagnostic, not just preparatory. It ensures:
• My body is ready for multi-planar movement and weighted training.
• I’m not feeling tension, soreness, or discomfort in sensitive areas.
• I protect areas prone to injury: shoulders, knees, lower back.
Common Warm-Up Movements I Use
• Cat-Cow, Upward & Downward Dog
• Cossack Squats & Middle Split Progressions
• Body Twists, Spinal Rotations, Arm Circles
• Foam Rolling & Mobility Flows, Band Work
• Animal Flows: Monkey, Crab, Tiger Walks
These movements are staples for me. I modify or skip exercises depending on my energy, mood, and any lingering aches.
Especially, in areas where I’ve been injured:
Shoulder.
Knees.
Lower back.
These are sensitive areas for me due to being inattentive, from compounding overuse injuries at my jobs, and persistent bad habits at home.
I took advice from my dad and previous bosses seriously: engage your core to prevent overcompensation.
Applying this consistently has reduced chronic pain and made me more aware of how my body moves.
This warm-up reflects how I train overall: adaptable, responsive, and built around listening rather than forcing.
What This Is—and Isn’t
This is my main example of what kind of fitness I train and how it has helped me prepare for longevity instead of chasing goals I don’t personally care for.
I’m not making this into a part of many videos; I’m not gatekeeping my training, I’m not hiding “my secrets” behind a paywall, I’m merely sharing something I’ve developed over 5 years because I’ve found something that works for me and my imperfect conditions.
Just like my Chaotic Life Strong Exercise Flows PDFs:, you can try out what I’ve shared, take what you find useful, adapt it to your situation, or ignore this entirely.
How you choose to fitness is up to you, but I’d rather chase being able to bear hug and lift people in my 80’s than live in a broken body at 30.
Separating Thinking and Doing With Different Platforms
The Stratagem’s Archive didn’t start out to be a business or a promotional thing.
The Archives started out as a pressure valve—to get the backlog of thoughts out of my head and avoid rotting me from the inside out.
During a new point in my day, I was led to explore another platform:
Ko-fi.
I made a Ko-fi account on a whim—even made a business PayPal account to keep my anonymity, to feel like I’m making progress in my life.
Making a Ko-fi account gave me a few questions I wanted to answer:
Could external support be possible for the archives if presented?
What would I do with this Ko-fi account?
I chose to separate my creative endeavors—my sketches and expanded D&D content and artistic learning curves—from my thinking out loud writing that exists on my blog.
It wasn’t as easy a decision for me to make because I thought Ko-fi was a social media account. I still don’t have social media; however, Ko-fi gets discovered through social sharing.
Thus came my third question to answer;
Could The Archives on Ko-fi be found organically?
That’s what I’ve been trying to figure out for the last 2 weeks now. I wanted to share that The Archives are slowly expanding and so are my personal skills.
How My Ko-fi Account Was Really Born
I’ve been recently presented with an opportunity to tap into my creativity, and I don’t know how to feel about it.
A coworker showed me a design that looked uneven, she was struggling to adjust it because she’s not used to drawing, and asked if I could help.
Granted, I told my coworker that I haven’t made anything in years—I’ve mostly drew with paper, colored pencils, and a 0.5mm mechanical pencil—and it had been just as long since I drew digitally on my iPad using Procreate.
My artistic skills were rusty and severely lacking; I never formally or informally learned to draw, but I was willing to take up the challenge of helping my coworker out.
She forgot to send me her blueprints for what she wanted, but I went off of memory and made my own similar design.
I liked how it came out.
My very first illustration of the new year. “A Shaka For a Friend.”
It was simple, the colors surprisingly popped, it took me 2 days to clean up, but the design was initially completed in 30-40 minutes.
My coworker was the first person, outside of family and polite acquaintances, who liked my work. I felt a small spark of happiness I thought was dead for years.
How This Opportunity Gave Me Options to Explore
My coworker has had her own online business for more than 10 years and she told me that some businesses were looking for designers to make things for them.
She admitted that she pays $400+ per design she likes and she was looking for a new permanent designer to work with her. My brain perked up.
Did I volunteer to be her new designer?
Nope.
I know my skills aren’t very professional, they’re very basic, and I’m still learning to use Procreate.
I’ve seen what kinds of things she has in her online store and I definitely am not the best fit for her.
Instead, I chose to showcase my work online, much like my blog and my writing, just to show it exists.
I’m not officially building a portfolio; I’m not actively looking to become a graphic designer; I’m not trying to make Ko-fi the thing that gets me out of my current jobs financially or schedule wise.
I figured Ko-fi was the best place to explore and share the things I’m making online. In my opinion, Ko-fi is like Fiverr, but for very creative minds and works of various art, skills, and knowledge.
Both WordPress/Jetpack and Ko-fi are the same containers:
The work exists; “If my work helped you feel less alone, this helps me keep making it.”